Showing posts with label Other. Show all posts

Friday, March 16, 2018

Mrs. Plant's MOST POPULAR Recipes [2018]

Often, I receive messages telling me about recipes people have made from my website and how they (and their families!) have really enjoyed them. I thought I'd put a list together of some of the top recipes from my website. ENJOY! (and bookmark this page!)

Main Dishes
Mexican Cornbread Dinner - Under Pressure!

Cheezy Sweet Potato and Kale Casserole in the Instant Pot

Tex-Mex Tofu Scramble - Also a GREAT breakfast!

Quick Noodles with Kale and Tofu in Peanut-Lime Sauce

Spicy Black Bean Burgers

Smoky Pinto Beans

Easy Chana Masala

Oil-Free Samosa Pancakes

CLEAN Shepherd's Pie


Soups/Stews
Pueblan Roasted Pepper Chowder

Corn and Potato Chowder

Instant Pot Hoppin' John

Potato Leek Soup in the Instant Pot

Wedding Soup - Aptly named! I made up this soup to eat every day before my son's wedding to lose a few LBs before the big day!


Salads/Dressings
Garlicky Kale Salad

Asian-Inspired Mason Jar Salad with Oil-Free Dressing

Zucchini Garlic Dressing (add fresh dill for a whole new flavor!)


Dips/Sauces/Salsas
Quick Cashew Queso

The BEST Veggie Cheeze (nut-free)

Salsa Fresca

Oil-Free Teriyaki Marinade/Sauce (especially great for marinating baked tofu or for stirfries

Oil-Free Marinara


Breakfast
Pumpkin Spice Muffins

Cacao-Berry Green Smoothie Bowl

Sugar-Free Chocolate Oats

Desserts/Snacks 
Oil-Free Chocolate Chip Banana Bread - Can be made into muffins, too.

Tastes-Like-Raisinettes Cookies

Chocolate Crunch Bites

Healthy Microwave Brownie in a Cup

Pumpkin Pie Snack Balls


Saturday, February 10, 2018

Make Your Own Peanut Butter--Cleaner and Cheaper!

There is never a need to buy peanut butter if you have a Vitamix, a Blendtec, or a Ninja blender! This peanut butter is clean...made from ONLY peanuts.

Here's an older video I made showing how to make peanut butter: https://www.facebook.com/mrsplantintexas/videos/683642098456044/

Also, check out the BEST jar spatula I have ever used!

Make sure to follow MRS. PLANT and join our MRS. PLANT COMMUNITY!


Tuesday, November 8, 2016

Soy Yogurt -- Made in the Instant Pot!

If you have the Instant Pot IP-DUO 7-in-1 with the yogurt feature, you can make your own soy yogurt with VERY little effort!
PLEASE read everything below BEFORE you start--INCLUDING the notes!

METHOD #1:
NOTE: You can make up to 4 pints in the Instant Pot at once! These instructions are showing you how to make one pint jar. Just follow the same instructions for EACH one you are making.

Step 1. Take 2 cups of Trader Joe's UNSWEETENED Soy Milk* in the aseptic (shelf-stable) container (containing only organic soy beans and filtered water!!!) and pour it into a pint-sized glass jar.
* You can use other brands of soy milk as long as they contained ONLY organic soy beans and filtered water.

Step 2. Stir in 2 T. of UNSWEETENED, PLAIN soy or coconut yogurt (or previously made soy yogurt) or 2 vegan probiotic capsules (emptied into the milk).

Step 3. Place the UNCOVERED jar in the Instant Pot inner bowl.

Step 4. Cover the pressure cooker top, set to SEALING, and click the YOGURT button.

Step 5. After 8 hours, cover the jar and chill it.


Method #2:

Step 1. Take 1 whole container (4 cups) of Trader Joe's UNSWEETENED Soy Milk* in the aseptic container (containing only organic soy beans and filtered water!!!) and pour it directly into the Instant Pot pot.
* You can use other brands of soy milk as long as they contained ONLY organic soy beans and filtered water.

Step 2. Stir in 5 vegan probiotic capsules (empty the capsules into the milk) or 1/2 cup of previously made unsweetened, plain yogurt into the soy milk. Stir WELL!

Step 3. Cover the pressure cooker top, set to SEALING, and click the YOGURT button.

Step 4. After 8 hours, cover the jar and chill it.

Straining the yogurt
NOTE: If you like your yogurt less sour, only cook for 7.5 hours. You can test the flavor any time after 7 hours by just inserting a clean spoon into the jar of yogurt and tasting it.

NOTE: If you want THICK yogurt, buy a jelly strainer bag or a nut milk bag and place it over a Mason jar. Tighten the string. Then, pour the yogurt in the bag over the jar and close the cap over it. Make sure the bag is high enough in the jar that it is not touching the bottom and there is room for the liquid to be released without touching the bag. Place jar in the refrigerator. Your yogurt (in the bag) will be thick in about 2-3 hours. Dispense of liquid in the bottom of the jar.

7. Add fruit and sweetener to your yogurt, if desired. We also use this yogurt as sour cream and for other condiments.

NOTE: This yogurt lasts about 4 days in the fridge. Make sure to SAVE at least 2 T of this plain yogurt to use for your next batch!


Disclosure: Mrs. Plant makes use of Amazon.com affiliate links when they are available. These are products I have personally purchased and recommend based on my experience with them. Your use of these links for product purchases provides me with a commission which pays for the food and supplies I use to keep this website alive. However, your use of these links as a reader is not required.

Saturday, October 29, 2016

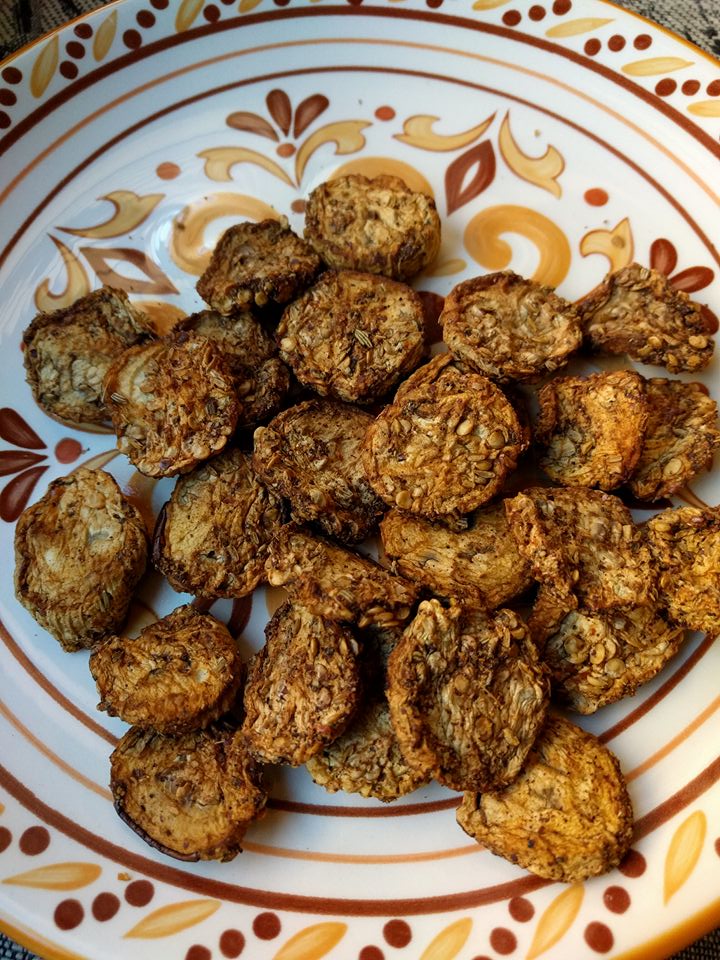
Eggplant Pepperoni

You might be asking, "What the heck are these???" Well tonight, we planned to make spinach mushroom calzones for dinner. My hubby likes Tofurky pepperoni in his; however, Whole Foods did not have any. So, I decided to do some research on how to make your own pepperoni spice and marinate circles of eggplant in the spice, dry them out in a low oven, and see if they made a good replacement. OH MY GOSH, Guys! These wonder circles taste JUST LIKE PEPPERONI!!!

1 t mustard seeds
1/2 t fennel seeds
1/4 t crushed red pepper (more if you like REALLY spicy pepperoni)
¼ t garlic powder
1/2 t paprika
1/4 t sugar
½ t. salt
1/2 t ground black pepper
1 t liquid smoke flavoring
1/4 cup water
1 small eggplant
1 small round cookie cutter (1 ½-2 1/2 inches in diameter) - optional

In a spice grinder/coffee grinder or mortar/pestle, add all of the spices (through salt in the ingredients). Pulse a few times so the fennel seeds and mustard seeds get cracked into small bits. Pour spice mixture into a small bowl. Add the liquid smoke and water to stir to create a marinade.
Pour the marinade in a glass pie plate.
Cut the eggplant into ½-inch slices. With the cookie cutter, cut out circles (avoiding the peel around the edges).
NOTE: If you don't have a cookie cutter, you can hand cut these or cut them into strips.
Place the circles into the marinade in a single layer.
Let the eggplant pieces soak up the marinade for about 30 minutes, then flip the eggplant circles over and let them marinate another 15 minutes. Discard marinade.
Place on a parchment paper-lined baking pan.
Bake at 225 degrees until almost dried out. This can take anywhere from 1-2 hours.

Making Spinach-Mushroom Calzones with Eggplant Pepperoni

Saturday, October 15, 2016

Dutch-Style Sweet and Sour Mayonnaise


Here is a divine, "junk-free" condiment I made with my homemade Instant Pot Soy Yogurt. I made it to use on veggie burgers, paninis, or wraps!

If you have the Instant Pot IP-DUO 7-in-1 with the yogurt feature, just take 2 cups of Trader Joe's UNSWEETENED Soy Milk* in the aseptic container (containing only organic soy beans and filtered water!!!) and pour it into a pint-sized glass jar. Stir in 2 T. of UNSWEETENED, PLAIN soy or coconut yogurt (or previously made yogurt). Place the UNCOVERED jar in the Instant Pot inner bowl. Cover the top, set to SEALING, and click the yogurt button. After 8 hours, cover the jar and chill it.
*You CAN use other soy milks, but they have to be unsweetened and contain ONLY soy beans and water.


Photo1Photo2


Photo 1:
I took the CHILLED homemade soy yogurt and placed it in a jelly strainer bag over a Mason jar. This is what it looked like at first. I put it in the refrigerator overnight.

Photo 2: This is what the Shows the amount of liquid that was released from the yogurt overnight in the fridge (making a Greek-Style yogurt).

Then in a small bowl, I whisked together the following ingredients until very smooth:
1/4 cup of the thickened soy yogurt (any kind, but homemade is best!)
1 T. coconut sugar
1/4 t. salt
1 t. yellow mustard
2-3 t. apple cider vinegar


Inspired by Tirza at Healthy Vegan Life


Disclosure: Mrs. Plant makes use of Amazon.com affiliate links when they are available. These are products I have personally purchased and recommend based on my experience with them. Your use of these links for product purchases provides me with a commission which pays for the food and supplies I use to keep this website alive. However, your use of these links as a reader is not required. 


Tuesday, April 19, 2016

Homemade Fruit Energy Gel

For those of you that run or ride long distances (and I don't mean in a car! LOL), my husband has created an awesome plant-based energy gel you can make for your workouts/races! This can be loaded into a soft flask like this one and taken with you to give you a jolt of carbs when you need them!

Homemade Fruit Energy Gel

12 oz. of frozen or fresh fruit (I used TJ's frozen organic strawberries)
7 organic pitted medjool dates
1/2 C filtered water (tap would do fine)
2 T lemon juice (lime would be fine also)
7-8 T raw sugar (almost any sweetener will do)
1/4-1/2 t pink salt (sea salt will work, too)
1 1/2 T chia seeds

NOTE: You could use all dates and no raw sugar, but the mixture might be too thick.

Put all but the chia seeds into a medium sauce pan, cover, place on stove and set heat to medium to medium-high. Once mixture starts to boil (3 or so minutes), turn down to medium low.  Simmer for 15 more minutes.  Stir the mixture and crush the fruit and dates down. Simmer for another 5 minutes.  As long as fruit is nice and soft, remove from heat and let sit for 5-10 minutes.

After mixture has cooled slightly, pour into the jar of your blender and add the chia seeds.  Blend the mixture, initially on low, gradually working up to maximum speed.  Blend until no chia seeds or large fruit pieces can be identified.

You should have about 3 cups of goop now.  Pour into a storage container at least 3.5 cups in size and cover and place in fridge.

When you go to use the gel, if it is deemed too thick for the gel flask, thin a little with more water.  You might also want to add a little agave to keep the calories at a sufficient level.

Enjoy your ride or run with your fruity, homemade, much cheaper gel!!

Disclosure: Mrs. Plant makes use of Amazon.com affiliate links when they are available. These are products I have personally purchased and recommend based on my experience with them. Your use of these links for product purchases provides me with a commission. However, your use of these links as a reader is not required. 

Thursday, March 24, 2016

DYO (Dry Your Own) Herbs!

When you see organic herbs on sale at the store, don't pass them up! It's simple to dry your own herbs and they taste so much better than what you can buy in a bottle.

I like to dehydrate my herbs in my dehydrator. The one I own is pricey, but I use it a lot (so it has been worth the investment)! However, any dehydrator will work! If you have a dehydrator, preheat it to 125 degrees. Simply rinse the herbs in cool water and shake them off to remove excess moisture. Cull through and remove any leaves that look browned or bruised. Lay stems of leaves on the dehydrator trays with ample space between them for good air flow. It will take between 1-4 hours to dehydrate herbs. You will know they are ready when the leaves crumble easily. You may have to check every 30 minutes to see how they're doing. When they're done, crumble the leaves into a small ball (removing from their stems). Then, place the dried leaves into a spice jar, either whole or crumbled.
NOTE: If any leaf is not dry, you could develop mold in the jar. Make sure to only include completely dried leaves.

Some additional notes...

Some people also dry their microwave oven. Generally, your microwave comes with instructions to do that or you can search online.

You can also dry herbs in your oven on paper towels under the oven light (overnight). Generally, it is best to pull the leaves off the stems to get the best results. You can stack up layers (paper towel with leaves on top), one on top of the other. I've never used this method, but I read that it works well!

Save your empty spice containers to reuse them. Simply add your newly dried herbs into those containers, but remember to re-label them with the correct herb name!

Freshly dried herbs are about 3-4 times stronger than fresh. I usually use 1/4 of what it says in a recipe that calls for fresh herbs.

Friday, March 4, 2016

Gomasio (Sesame Salt)

My precious friends (shout out to Sarah and Dean!) shared this fabulous brown rice topping with me at their home one day. But, I have to start with a disclaimer because I dropped the pestle (yes, this is made with a good 'ol mortar and pestle!) and broke it in half mid-grinding. So, my gomasio is not as crushed as it should be.

So, what *is* Gomasio (also written Gomashio) you may ask?!? Gomasio is a dry condiment, made from toasted sesame seeds and salt. It is often used in Japanese cuisine, and it is also sometimes sprinkled over plain rice. It is oftentimes part of a macrobiotic diet, used to reduce the amount of salt in a dish.

I made a very small batch (which will last me a while!), so you can always scale this up if you like.

For this recipe, you will need:

A mortar and pestle or a small coffee grinder
2 T. white sesame seeds
1/4 t. Himalayan pink or sea salt
1/4 t. dried kelp granules (optional)

In a nonstick skillet over medium heat, add the salt. Toast the salt few a few minutes, moving it around constantly in the pan. Remove it to a small bowl.

Add the sesame seeds to the warm skillet and toast the for several minutes until they are golden brown, moving them around constantly with a small silicone spatula.

Depending on the size of your mortar and pestle, you may need to crush the sesame seeds in batches. You will hear them pop as you crush them. Try to crush them 95% of the way. Add the crushed sesame seeds to the toasted salt in the bowl. Add the kelp granules if desired. Mix together thoroughly and store in an airtight container. This is AMAZING on brown rice!!!


Sunday, November 29, 2015

HOLIDAY GIFT IDEAS!

Our favorite banana slicer! We use it EVERYDAY!
I've added several more of my favorite kitchen gadgets/products to my recommendations page. These are all wonderful products that have made my life easier! Everything from the convection toaster oven we have (and the one we used to have--both of which we love!) to a cheap gadget to take the skins off garlic. I've listed great options for stocking stuffers to appreciated appliances!
ENJOY!

Wednesday, November 25, 2015

Where Are You From?

I recently checked the stats on my food blog and saw the Top 10 places where people who visit my food blog come from. I know there are many of you from other places, too! I REALLY want to meet you and know more about you. So, please write to me from the "Contact Mrs. Plant" form on the RIGHT side of the home page (www.mrsplantintexas.com) or in the comments below. Introduce yourself! Tell me how you came to be interested in whole foods plant-based eating and share your story. Would love to connect with you!

We're all in this together!

Friday, October 9, 2015

Marinated Baked Tofu - Tofu You Will Love!

In most restaurants, when you order a dish and sub out tofu for meat, it will generally be fried or super jiggly--neither of which are ways I prefer to eat it. I don't want the oil from the fried version and I HATE my tofu jiggly! So, whenever I add tofu to a recipe, I always marinate and bake it. It's super easy! Here is a link to the Tofu Press I use and LOVE!
Affiliate Link: http://amzn.to/2bZlHhg
Drain, press, and cut firm or extra-firm tofu into chunks
Marinate for at least 30 minutes
Bake on non-stick foil

I generally marinate the tofu in whatever sauce I am using for the stirfry or dish. If I don't have a sauce made up to use, I marinate in something like this...

Marinade A for Tofu:
2 T. lite soy sauce, tamari, or coconut aminos
2 t. bee-free honey, date syrup, maple syrup, or other liquid sweetener
2 T. water
2 t. liquid smoke

Marinade B for Tofu:
1 T lite soy sauce, tamari, or coconut aminos
1½ tbsp rice wine vinegar or red wine vinegar


Directions:
Drain and press your firm or extra-firm tofu to remove as much water as you can from it. Cut into cubes or slices.
Marinate the tofu for at least 30 minutes (to as long as overnight) in your sauce or special marinade. Turn the pieces in the dish to make sure all sides are coated.

Place the pieces on a baking sheet covered in Reynolds nonstick foil. Bake at 375 degrees for about 25-30 minutes, turning the pieces over halfway through. It may take longer to de-jiggle them! When they're done, add them to your dish! They take on the flavor of the marinade or sauce you are using.


Disclosure: Mrs. Plant makes use of Amazon.com affiliate links when they are available. These are products I have personally purchased and recommend based on my experience with them. Your use of these links for product purchases provides me with a commission which pays for the food and supplies I use to keep this website alive. However, your use of these links as a reader is not required.

Wednesday, September 2, 2015

Shout Out to Me!

Unrelated photo of my dinner, but I had to add a photo
to get your attention! ;-)
I have been reviewing the stats from my food blog and LOVE LOVE LOVE that there are people from all over the world checking out Mrs. Plant. I want to hear from you, so post a message to me here (below this post), or send me an e-mail letting me know which recipes you've tried, whether or not you liked them, and any special requests you have. I want to connect with you!

[pictured: pressure-cooked Yukon Gold potatoes covered in "Oat" Cheese, sprinkled with vegan bacon bits, along with luscious steamed broccoli]

Sunday, June 14, 2015

Dehydrating Fresh Herbs

Today, I had to buy a big bunch of organic parsley for a dressing I was making, but I only used a small portion of it. I hate to waste food, so I simply dehydrate the remaining herbs if I know I won't be using them for another recipe in the near future. I love using my own spices rather than having to buy them. I just save the containers from store-bought spices, wash and dry them, and re-use them when I dehydrate. This dried parsley smells AMAZING!

Baked Pita Chips (NO OIL)

Place pita triangles on trays in a single layer
What can you eat with low-fat/fat-free hummus or dips besides veggies? You can make your own whole wheat pita chips easily without any oil!

Step One: Buy 100% whole wheat pitas.
Step Two: Cut them into 8 triangular sections.
Step Three: Cut the ends off so they are easy to separate. Don't throw out the ends! Bake them and use them to dip in your oil-free hummus!
Step Four: Separate each triangle into two pieces and place on baking trays in a single layer.
Step Five: Preheat your oven to 325 degrees. Place triangles on baking sheets and bake them until crispy (golden) but not burned! Approximately 10-15 minutes. If they're cold from the fridge, it will take longer. Keep checking them after 10 minutes to see how they look. Store in airtight container for weeks!


Cooling the pita chips altogether on one tray

Saturday, May 30, 2015

Education Lesson: Cooking Gadgets

Admittedly, I get a lot of help with my cooking. What I mean is, I use GADGETS. With a very busy life, these gadgets are super helpful in getting healthy meals on the table, so I thought I'd share my favorites with you. All are tried and true. LOVE THEM!
Can you tell I shop at Amazon.com?!??! :-)

1) Messermeister Vegetable Peeler – You will throw all your other peelers out! Peels kiwi, mangoes, a bag of potatoes in 5-10 minutes!

2) Veggie Chopper with Removable Grids – Chop onions, potatoes, peppers, apples, and more! LOVE this addition to my gadgets family!

3) Chef'n Pull-string Hand Chopper – Chop nuts, onions, etc. with this easy-to-clean chopper! Works your forearms, too!

4) Spiralizer- You can probably find a better price for this elsewhere; however, this is the one I own and love. You can spiralize raw zucchini in minutes!

5) Reconditioned Vitamix -  for free shipping, order through this web page instead. I cannot tell you how many times a day I use my Vitamix!!!

6) Secura Pressure Cooker - I know a lot of people buy InstantPot brand, but I love my Secura! It's similar in cost, but I think it's smaller on the counter (though the same size internally), and it is simple to use. Down the road, I added the nonstick pot and the stand/steamer basket combo to my collection. I would highly recommend having the extra non-stick pot for sticky items like oats, rice, etc. and the steamer basket and stand to steam veggies and cook potatoes.

7) Hand-Held Citrus Juicer and Electric Citrus Juicer- I have both of these, and use the electric one only when I juice a whole bag at a time. I like juice fresh lemons and limes and freeze them in ice cube trays for future use. Then, I store them in freezer bags. This prevents citrus from going bad before I get around to using it!

8) Garlic Press and Garlic Peeler - I did a lot of research. These are both fabulous!

Sunday, May 10, 2015

Flat-Bread Crackers

It's hard to find crackers that are't loaded with unwholesome ingredients or processed grains. These flat-bread crackers are easy to make and provide a great base for spreads or on the side with soup. And, they have only TWO ingredients!

Flat Bread Crackers
1 1/2 cups whole wheat flour
1/2 cup cold water (or a little more if needed)

Preheat oven to 400 degrees. Put the flour into a large bowl. Slowly add water and mix with your hands until the flour and water becomes a dough (it should not stick to your hands, but shouldn't be too dry either). Move the dough ball to a wooded board and knead it for about 5 minutes. Divide it into 6 equal pieces. Then, roll each piece out as thin as possible (thinner than in my photo!), place on a parchment-lined baking sheet, and poke holes all over with a fork. Add salt and seasonings if you desire, lightly pressing them into the flat bread. Bake for 5 minutes on the baking sheet, then remove and stick the flat bread pieces directly onto the rack until lightly browned and crispy. DO NOT LET THEM BURN.

When they are cool, you can break them up into smaller pieces.

Friday, May 8, 2015

Roasted Peppers (WITHOUT oil!)


AFTER roasting (WITHOUT oil)
It is simply NOT true that you have to use olive oil to roast peppers. I simply lay my red bell pepper pieces on Reynolds Non-Stick Foil and roast for 15 minutes in my toaster over on 400 degrees. Then, I freeze 1/2 cup baggies of them so they're ready when we want to make Cashew Queso!

Sunday, May 3, 2015

Vegan "Bacon" Bits

Baked Potatoes make an easy meal. The problem with baked potatoes is that you lose the nutritional benefit when you fill them with butter, sour cream, bacon, and cheese. This one is equally delicious with nutritional yeast flakes (lots!), unsweetened non-dairy milk, homemade vegan bacun bits (recipe to follow), a pinch of Himalyan pink salt, and crushed kale chips. SO delightful!

Vegan "Bacon" Bits
2 tsp salt
4 tbsp boiling water
2 tbsp liquid smoke
1 C dry TVP (texturized vegetable protein) granules (like Bob’s Red Mill)

Whisk together the salt and water, until salt is fully dissolved.
Add liquid smoke and mix.
Add tvp and stir well to distribute liquid evenly, until all liquid has been absorbed.
Spread on a baking sheet and bake at 250°, stirring frequently to prevent burning, for 15 minutes or until fully dehydrated and crispy.
Allow to cool fully and store in an airtight container.

Chopping Onions

I have a wonderful chopper that I use to dice onions. I got it on Amazon.com, and it is one of the most helpful tools if you're making a lot of plant-based food. So, I take a bag of organic onions, cut them in half, remove the outer layer, cut them into quarters, and use the dicing tool to chop them. It takes about 3 minutes for an entire bag of onions!

I put all of the onions into a big bowl. When I am done chopping, I scoop out 1 cup measures and put them into sandwich-sized plastic baggies (which can be reused!). I push the air out of the bag, zipper them, and put all of the baggies into one gallon-sized freezer bag. I store them in the freezer for future use. Being that the onions are frozen, they STEAMFRY wonderfully without any oil on medium-high heat. I use them in soups, stirfries, etc.

Baked Kale Burgers

We made a few modifications to the kale burgers from the "Prevent and Reverse Heart Disease" cookbook, and we love the result!

Baked Kale Burgers
2 onions, chopped finely
4 cloves of garlic, crushed
8 oz. of mushrooms, chopped finely
2-3 cups kale, chopped finely
2 cans cannellini beans, mashed well
2 cups mashed sweet potatoes
1/2 cup organic frozen corn, defrosted
2/12 cups organic old-fashioned oats
Salt/pepper to taste
Whole-grain buns or sandwich thins

Steamfry onions until golden in a large skillet. Add garlic and mushrooms. Cook until most of the liquid is evaporated. Add kale and cook for 1-2 minutes until wilted.
Preheat oven to 400 degrees.
In a large bowl, mash cannellini beans until all beans are mashed. Add sweet potatoes, corn, oats, and cooked veggies.
Stir all together well. Add salt/pepper to taste.
Make patties the size of your buns.
Place on parchment paper-lined baking sheets.
Bake on one side for 15-20 minutes. Flip over and bake another 15 minutes, until both sides are crispy.
Serve on whole-grain buns or sandwich thins.

Adapted from the Prevent and Reverse Heart Disease cookbook