Sunday, February 28, 2016

Cheezy Sweet Potato and Kale Casserole in the Instant Pot

3 lbs Sweet Potatoes, cut into 1" for pressure cooking
1 bunch of Curly Kale Leaves, chopped small -- dry in salad spinner or place in fridge for an hour to dry before adding to recipe

Sauce:
1/2 cup slivered, blanched almonds (soaked in water for at least 30 minutes beforehand)
2 cups vegetable broth
1/2 cup unsweetened, non-dairy milk (I used homemade almond milk)
1 T white or yellow miso paste
1 tsp garlic powder
1 tsp onion powder
1/4 t. black pepper
1/2 t. salt

Variation: See note below
Blend all of the sauce ingredients in a blender until smooth in a high-speed blender.
Layer the sweet potato chunks and kale in the pressure cooker pot. Pour sauce over everything and stir well. Cook on high pressure for 5 minutes with QUICK RELEASE. If sweet potatoes aren't perfectly tender, close the top and leave in to cook just a minute or two more. Do not reset the pressure cooker or the potatoes will turn to mush.
NOTE: If the sauce seems too thin, that means your kale was too wet. Simply turn on the saute feature of your Instant Pot for a minute or so, stirring gently, until the sauce thickens a bit. Serve!

NOTE (variation): After cooking in the pressure cooker, move the casserole into a ceramic or glass casserole dish, top with Panko Bread Crumbs, and bake in a 350 degree oven for 7-8 minutes.


Inspired by Cooking with Plants

Saturday, February 27, 2016

Homemade Almond Milk

Doesn't every plant-based food blog have to have a post on making plant-based milk? The reason I am writing this post is to share with you the benefits of making your own plant-based milks...both economically and nutritionally.

Making Homemade Nut Milk
These are the items you will need to make it:

~ A blender

~ A nut milk bag - I have had a couple of nut milk bags, and the one I just bought is BY FAR my favorite one. It's by a company calle d EcoPeaceful. The bag is completely made of organic cotton, and doesn't have any toxic plastic in it like some nut milk bags do. The weave is very fine, allowing you to completely separate the pulp, leaving smooth and creamy milk behind.
~ 1 cup of almonds
~ 5 cups of filtered water
~ vanilla extract
(optional)

In a medium-sized bowl, add the almonds and 2 cups of filtered water. Let the nuts soak (covered) for 6-8 hours on your counter. Drain the soaking water and rinse the nuts well.

In your blender, add 3 cups of cold, filtered water and the soaked nuts. Blender for about 2 minutes, until the nuts are pulverized well.

In the same bowl you used to soak the nuts, place the nut milk bag in it with the opening spread wide. Pour the almond mixture into the nut milk bag, gently squeezing all of the milk through it until you can't get anymore milk out. Twist the nut milk bag well to make sure all of the milk has been released into the bowl. You can save the nut pulp inside the bag for other uses. I will write a post on this, as well. For now, place it in a zippered baggie in your fridge.

Add a teaspoon of vanilla extract to the almond milk, if you desire. Stir well. Store the milk in a tightly closed container. It will stay fresh in the fridge for about 3 days. You will yield about 3 1/4 cups of almond milk.

NOTE: If you like your almond milk thinner, add more water and stir.

Cost Comparison
So, what does this homemade milk cost compared to buying some in the store?
About 4 cups of Silk Almond Milk (shelf stable) costs about $2.24 at Wal-Mart.
There are approximately 3 1/2 cups of almonds in one pound.
A pound of almonds costs $8.99 at Sprouts, which would make about 3 1/2 batches of almond milk, costing you $2.57 a batch. If you could find almonds on sale, it would be even cheaper.
But, the best part is that the milk is made from nuts and water. No added garbage! And, it tastes amazing!!!

Friday, February 26, 2016

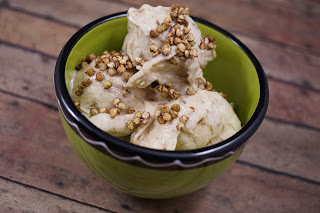
Cinnamon-Toasted Walnut "Nice" Cream


We have put together several combinations for "nice" cream, but this one tops the list! The toasted walnuts and salt with the crunch of the cinnamon buckinis is a delight in your mouth. All whole foods!

3 frozen bananas, thawed for 10 minutes
1/4 cup walnuts, toasted
3 Medjool dates, pitted
1/8 t. Himalayan pink salt
1/4 t. Ceylon cinnamon
1 T. cinnamon buckinis (and more to top)

Cinnamon Buckinis

Since discovering buckwheat groats (affectionately known as "buckinis"), I have put them on my "nice" cream as a ritual. But, I planned to make baked apples for company this weekend, and I thought they would be ultra-delicious with cinnamon buckinis sprinkled on top. This is what I came up with. You do have to prepare to make these well in advance (the day before), but once made, they will last until you eat them all.

1/2 cup buckwheat groats
water
2 t. liquid sweetener (I used date syrup, but you could use maple syrup or agave)
1/2 t. cinnamon

Soak the buckinis in plenty of water for 4-6 hours. They will become goopy because they have a coating on them that releases when you soak them. Strain and rinse the buckinis well. Put them back in a clean bowl of water for another 8 more hours or overnight. Rinse and drain well. Place them in a bowl and stir in the sweetener and cinnamon to coat.

Two methods for cooking:
1) Dehydrate buckinis on a silicone mat for about 8-10 hours or until dried out and crispy
OR
2) Bake on lowest setting in your oven with the door cracked open until they become dried out and crispy.

Store in a jar or other air-tight container.

Thursday, February 25, 2016

Sign Up for Mrs. Plant E-mails Sent Directly to Your E-Mail

If you aren't already getting my food blog posts in your e-mail, sign up now! You can delete posts that don't interest you and file away (in folders) ones you want to keep...especially RECIPES!

Enter your email address:


Delivered by FeedBurner

Chocolate Chia Seed Pudding

1 small jar
1/4 cup chia seeds
3 T. cocoa powder
dash of sea salt
1 cup plant-based milk (I used soy)
3 Medjool dates (or 1 T. date syrup)

NOTE: If you use date syrup, you don't have to do any blending.

In a small jar, add the chia seeds, cocoa powder, and salt. In a blender (smaller the better), combine the milk and dates and blend until smooth. Add to the dry ingredients. Put the top on the jar and shake really well. Store in fridge overnight and eat the next day

Wednesday, February 24, 2016

Coconut Oat Balls

1 cup of Medjool dates
1/3 cup cashew butter
1/3 cup unsweetened dried coconut
1 cup old-fashioned oats
1/2 cup brown rice crispy cereal
2-3 T. non-dairy milk

Preheat oven to 350 degrees.
Mix the first 5 ingredients in the food processor until combined. Then, slowly add non-dairy milk until the mixture is a sticky enough consistency to make into 1-inch balls (or scoop with a cookie scoop).
Place dough balls on parchment paper-lined baking pan. Bake for 10 minutes or until firm and golden brown on the outside. Let cool before serving.

Monday, February 22, 2016

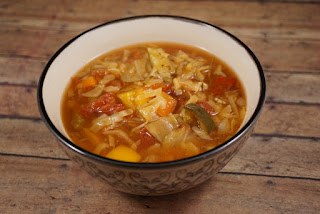
Vegetable Cabbage Soup

We don't count calories on a WFPB lifestyle, but because this soup is so low in calories and contains NO FAT, you can eat a little more decadent at another meal. Packed with veggie goodness, this soup will allow you to check mark off several items on Dr. Greger's Daily Dozen app!

1 head of green cabbage, shredded (or use a 16 oz bag of shredded cabbage)
4 garlic cloves, minced
2 stalks celery, chopped
1 yellow onion, chopped
1 large yellow bell pepper, chopped
2 medium organic zucchini, diced
8 cups of organic vegetable broth
1 T organic tomato paste
1 28 ounce can Italian-style diced tomatoes (with basil, garlic, oregano)
2 bay leaves
1 teaspoon salt
1/4 teaspoon ground pepper
1 t dried basil
1 t. dried oregano

Dump everything into the pressure cooker (or slow cooker) and set to SLOW COOK for 3-4 hours. You can also make this in a big pot on the stove. Bring ingredients to a low boil for a few minutes, cover, and cook for 2-3 hours on medium low until all the veggies are tender. Stir occasionally.

Adapted from Fred Detwiler's amazing recipe. Visit his YouTube channel at Plant-Smart Living with Farmer Fred!


Saturday, February 20, 2016

Garlicky-Spinach Alfredo Pizza with Smoky Mushrooms

Recipe UPDATED on 11-3-2019

8 oz. baby bella mushrooms, sliced
1 T. liquid smoke
1 T. lite soy sauce
1/2 lb (about 1/2 bag) of frozen spinach
1/2 cup raw cashews (soaked for 4 hours if you don't have a high-speed blender)
1/2 cup water
2 small or 1 large clove of garlic
1 T. nutritional yeast flakes
1/4 t. sea salt
homemade oil-free pizza dough (or any other crust you like!)

Place mushrooms in a skillet with the liquid smoke and soy sauce. Cook them for about 5-10 minutes, so the sauces can be absorbed. Drain off excess liquid. Set aside.

While your mushrooms are cooking, add the cashews, 1/2 cup of water, garlic, nutritional yeast flakes, and salt to your cup blender and blend until smooth and creamy. Place spinach in a plastic bowl and microwave for 3 minutes. Let cool for a couple of minutes and pour off any excess liquid. Add sauce to the spinach. Stir to combine. Set aside.

Prepare your dough on your pizza pans. We have these personal-sized, nonstick pans that we really like! Top with the alfredo spinach. Add mushrooms to the top and bake at 525 degrees until the edges of the dough are browned and crispy (about 13 minutes). Cut and serve with vegan parmesan cheese:

Vegan Parmesan Cheese in Vitamix:
1 cup of slivered blanched almonds
¼ cup nutritional yeast flakes
½-¾ t. salt
Pulse in blender until desired consistency, but do not overblend.

Saturday, February 13, 2016

Potato Croquettes

I love trying recipes and modifying them so I can bring them to you. Knowing that someone else has tested them is comforting, isn't it!?! This recipe barely needed to be modified because it was already oil-free and vegan. I just swapped out whole wheat bread crumbs for white. No other changes. They were amazing! Also, I want you to check out the recipe and this YouTube channel where it came from...The Vegan Corner. They are AWESOME!

Thursday, February 11, 2016

Homemade Oil-Free Blender Hummus

There is really nothing like homemade hummus...I mean making hummus from dried garbanzo beans that you cooked yourself! This version was adapted from the beautiful Susan Voisin's FatFreeVegan.com recipe. It came out smooth, creamy, and amazing!

Step 1: Rinse and Drain 1 pound of dry garbanzo beans
Step 2: Place them in your electric pressure cooker with 8 cups of water
Step 3: Cook on high pressure for 35 minutes with NATURAL release
Step 4: When the beans have cooled a bit (and you can open the top of your pressure cooker), measure out 3 cups of the beans from the pressure cooker and place them in your high-speed blender with 1 cup of the cooking liquid. You can refrigerate or freeze the remaining bean and aquafaba (cooking liquid) for another use.
Step 5: Add the following to the blender...
3 cloves of garlic
2 chunks of roasted pepper
2 T. tahini
3 T lemon juice
1 t. cumin powder
1/4 t. smoked paprika
1/4 t. ancho or chipotle chili powder
3/4 t. salt

Blend until very smooth and serve with baked pita chips!

Mrs. Plant's Audio Podcast #5 - Carbohydrates - Angelic or Evil?

Wednesday, February 10, 2016

Valentine's Day Treat

I'm not a real romantic, but I DO love a dessert on Valentine's Day. This healthier version of brownies is made in single batches, so you can just make one for you and one your mate! No 13x9 pan of brownies staring at you for the rest of the week!!! ;-)

Recipe Serves ONE!
1/4 cup whole wheat flour
2 T. coconut sugar or sucanat
2 T. unsweetened cocoa powder
1/4 t. baking powder
1/4 cup unsweetened applesauce
3 T. non-dairy milk
2 T. non-dairy chocolate chips (Ghirardelli semi-sweet work well)


NOTE: You can mix up this batter directly in the mug or bowl, or make in another bowl then fill your vessel.

In a large mug or soup bowl (or decorative heart-shaped ceramic bowl or baking cup), put all dry ingredients and whisk well with a fork. Add wet ingredients and stir with a spoon. Add chocolate chips and stir in. Consistency should be like cake batter. Microwave on high for 2 1/2 minutes. Delicious served with some banana "nice" cream or fresh strawberries!

Inspired by Lindsay Nixon

Monday, February 8, 2016

Crispy Cinnamon Apple Rings

I watch A LOT of food/recipe videos, and I really like ones like Tip Hero and Tasty. Unfortunately, many of the recipes are not WFPB or contain dairy, animal products, eggs, or oil. Today, a friend (shout out to Jimmy!) posted this video and though it was ridiculously fattening and not vegan, I thought, "This CAN be done!" So, I grabbed a Fuji apple out of the fridge, and this is what I made. OMG! My husband and I gobbled down the "rings" in seconds flat. They were crispy and apple-y and cinnamon-y, and WOW!

This is the batter PER each apple you use. So, double or triple or whatever depending on how many you decide to make. I used one Fuji apple (with the peel on!), and that was a nice little treat for me and my husband to share after dinner.

Preheat your oven to 400 degrees F.
Line a baking pan with parchment paper.
Slice apple(s) 1/2 inch thick and cut out the center with a large circular cookie/biscuit cutter, leaving about a 1/2-inch ring. Dry all of the apple "rings" well with paper towel.

Then, in a bowl, combine the following:
1/4 cup whole wheat flour
1/4 t. cinnamon
1/4 t. baking powder
1 t. coconut sugar
(or other raw sugar that is finely ground)
dash of salt
non-dairy milk (start with 2-3 T. and add more until the batter is the consistency of pancake batter)

Dip the apple rings in the batter and coat well. Tap off on the edge of the bowl and place on parchment-lined baking sheet. Do this for all apple rings.
Bake for 15-20 minutes until crispy on all sides. I did not even have to flip mine over to achieve this.

Finally, in a small bowl, combine some maple syrup with cinnamon.
Brush onto warm, crispy apple rings and serve!

Asian-Inspired Mason Jar Salad with Oil-Free Dressing

At one of our local community PlantPure Nation meetings, the beautiful Nabila at www.spiritplate.com demonstrated her version of Asian-Inspired Mason Jar Salad with oil-free dressing. That's what's for lunches this week!
Here's how to make the ones you see above, in this order...

1/4 cup of the oil-free dressing, recipe below
1/4-1/2 cup chickpeas
1/4 cup carrots, sliced
1/2 cup red cabbage, shredded
1/4 cup red/orange/yellow bell pepper, sliced
2 T dried cranberries
1 T. Curried-Maple Walnuts, chopped
1+ cups baby spinach

To make the oil-free, Asian-inspired dressing, mix together 1/4 cup of each of the following in a small jar:
low sodium soy sauce
maple syrup
rice vinegar
fresh lemon juice
plus
1/2 t. chili-garlic sauce or red chili flakes

Saturday, February 6, 2016

Mexican Cornbread Dinner - Under Pressure!

Whenever I make a "one-pot" meal, I try to make sure it's well-balanced. That means, including whole grains, beans, greens, and veggies.

This idea came to me after planning a dinner party for this weekend, which included oil-free corn bread. I wondered if I could "bake" my corn bread in the pressure cooker RIGHT ON TOP OF the dish, and what do you know??? It worked beautifully! I completed the test kitchen run around 9:30 in the evening, and my husband had already brushed his teeth. I coaxed him into tasting the new dish, and he ended up eating half of a HUGE portion! It is SO easy to make and DELICIOUS!

1 large onion, chopped finely
2 garlic cloves, minced
1 28-oz can or two 15-oz. cans of fire-roasted chopped tomatoes, including the liquid
1 T. lime juice
2 cans of black beans, rinsed and drained
2 cups of frozen corn
1 4-oz. can of green chiles, including the liquid
3 handfuls of fresh baby spinach
1 1/2  t. cumin
½-1 t. chili powder (based on your spiciness level)
3/4 t. salt
3 dashes of Liquid Smoke

Corn Bread Layer:
1 cup of whole wheat, whole wheat pastry, or spelt flour
1 cup of cornmeal (fine ground)
1 T. baking powder
pinch of salt
1 cup unsweetened, non-dairy milk
1/4 cup maple syrup
1/4 cup unsweetened applesauce

In a large bowl, add the onion, garlic, tomatoes, black beans, lime juice, corn, green chiles, spinach, cumin, chili powder, salt, and liquid smoke. Stir well to combine.

Whisk together the dry ingredients for the corn bread layer in a medium-sized bowl. Add in the non-dairy milk, maple syrup, and applesauce. Stir together to combine. Pour the cornbread mixture over the other mixture in the pressure cooker, spreading level.

Cook on high pressure for 10 minutes with quick release (slowly turning the valve so the liquid doesn’t spray out). Turn off the pressure cooker and LEAVE THE TOP ON for 10 more minutes. Open the top and serve.


Monday, February 1, 2016

Layered Mexican Casserole

I wanted to make a Mexican dish this week and opted for an adapted version of Jeanne Schumacher's Mexican Lasagna. Since we have a homemade Salsa Fresca recipe that we love, we opted to use that throughout the casserole. Also, I chose to use black beans and pinto beans because those are our favorites in a Mexican dish. Instead of the corn salsa, I did go ahead and use a bag of frozen, organic corn (which I mixed with cumin, chili powder, and about 1/4 cup of my salsa). For the "greens" layer, I just used organic baby spinach. In addition, I wanted to top the casserole with some of Del Sroufe's tofu sour cream (1 chilled container of Mori-Nu Lite silken tofu, 1 T red wine vinegar, and 1 T. lemon juice blended until smooth) mixed with about 3 T. of my salsa and also some of our Cashew Queso, which is a family-and-friends favorite! OH-EM-GEE! This dish was fabulous and EASY!!! This will be our dinner for the next 2-3 nights, and I'm OK with that!